Thursday, September 22, 2011

Mantle Clock Makeover

Josh gave me this clock for Christmas when we were dating. It has been sitting on top of the Entertainment Center since that day and never changed. That was 7+ years ago. I was itching for a change but didn't want to buy a new clock. This one is special to me. So, I decided to give it a facelift.
Before

This was the simplest, cheapest project ever! I found a piece of scrapbook paper that I liked and used mod podge to glue it over the existing blue mat. I used the same scrapbook paper to wrap the candle in the Apothecary Jar to tie it together. I then printed out the saying "Families are Forever" from my computer and it's held in with scotch tape. I can change out the quote at any time. It took about 10 minutes total and cost less than $1. I love making something totally new out of something I already own. It's better than shopping!

My First Furniture Makeover!

One of my favorite sites to follow is http://www.infarrantlycreative.net/. She does some amazing things with a can of spray paint and someone else's trash. She calls these roadkill rescues. I'm a fan of Craigslist and I happened across this entertainment center listed for FREE! Free is always better. She looked a little dirty and worn but, with a little paint and some new hardware I knew she could be a real looker.
Here's a Before shot. I fell in love with all of the storage space. It is way bigger than the entertainment center we had before. It's missing the glass door in this picture. Josh had to reglue the frame back together.

This is one of my favorite features about this entertainment center. One side is for DVDs and the other CDs. We have put all of Lil Man's DVDs in there. It is perfect!

Pic of the original hardware. I wasn't a fan.

Ta Da!! I gave her a couple coats of primer for laminate and a few coats of black paint. I added brushed nickel knobs for an update. I liked all of the shelf space but, I didn't like that you could see everything in there. I don't like clutter and it was very distracting. So, thanks again to Infarrantly Creative I came up with this;

I bought some coordinating fabric and pinned it up with flat head tacks. So much better. It's amazing what one piece of fabric can do to the whole piece. I also used the fabric trick on a glass cabinet in my bathroom.

I'm not going to lie this took a lot of work and I wanted to give up halfway through but, with a lot of encouragement from my husband it is now sitting in my living room and I love it!

Tuesday, September 20, 2011

Baby Shower Decor/Ideas

Saturday, my friend, Mika and I threw a shower for our very good friend, Tiffany who is expecting a little boy. We had a great time planning and decorating. Here are some of the things we did.
Mika did an excellent job with the games and prizes. For the prizes there were popcorn bowls with popcorn and M&Ms. I love the "She's Gonna Pop" sign.

We used toys for centerpieces and then we had mommy advice cards on the table.

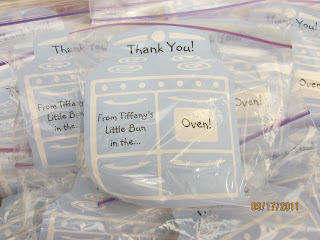
I made little ovens on my Sillhouette. Each bag had a cinnamon roll in it as a thank you.

Mommy's chair of honor. We also hung a clothesline complete with the stork flying over head.

I have seen diaper cakes and wreaths but, I really liked this. It was very appropriate because Tiffany's husband loves motorcycles. I saw a picture of this on Amazon. Josh helped me with the wheels. It was just a matter of spacing them out on the ribbon. I will have to post a tutorial. I loved how this turned out!

Side view

I hope this gives you some decor ideas for the next shower that you plan.

Sunday, September 18, 2011

Cami Fake Out

Don't you just hate it when you find a super cute shirt and then you try it on and it reveals just a little bit too much? For me that means adding a t-shirt or camisole under it. I don't know about you but I hate the extra bulk and warmth it provides especially in the summer. So, I got out some scrap knit and whipped up one of these little babies;
Supplies needed;
2 snaps
any color of knit and matching ribbon
sewing machine

As far as skill level involved it is very basic. Measure the distance between your bra straps while wearing your bra. Then, measure to the base of your bra. Knit stretches so you can cut the knit a little smaller so it fits more snug between your straps. I hemmed the top and zigzagged stitched. Then, I attached the ribbon to both sides. Make sure to heat seal the ends of your ribbon with a lighter to prevent fraying. Next, attach your snaps making sure there is enough ribbon to wrap around your bra strap.  That's it! You are done.

So much better and no extra bulk! It is very comfortable and you don't even know you are wearing it. No more bending over and worrying about everyone seeing down your shirt. These would be great for moms who are nursing too. Now I'm going to make a bunch of these in different colors. You can also add lace to the top too. It is very basic so it's easy to personalize. Hope you find this one helpful.

Goodwill ROCKS!

I am not ashamed of thrift stores or garage sales. It is one of the best ways to save money. Lil Man and I got to spend the day with my Dad last week and we hit up the local Goodwill. We had a great time! Well, lil man sure did. He made out like a bandit.
He got a Radio Flyer fold up tricycle in great condition for $5. I've seen these at the store for like $40. He is absolutely thrilled with his new wheels!

We also found this fully stocked Little Tikes workshop for $5! Now he has his own spot in the garage to work in with Daddy!
Last, I found him the most adorable Halloween costume. I was originally going to make his costume but, he really like the one we  found and so did I. I will post pics of it later.

So, hit up your local thrift shop and see what great things you can find!

Homemade Apothecary Jar

I love Apothecary Jars but, I am not willing to pay the price for them. I happened across the site http://www.dollarstorecrafts.com/ and found this simple tutorial. I spent about $10 total. I couldn't think of what to put into it so, it's been sitting naked on top of the entertainment center until the other day.
I bought a bag of river rock and a tall glass candle from Dollar Tree. Then, I wrapped scrapbook paper around the candle and tied it up with rafia. The paper is removable so I can change it out. I attached it with scotch tape. Last, I LOVE the beaded vines. They are literally all over my house so of course I added one around the base.

I love how it turned out and I'm really excited that I can change it out for seasons and holidays. I think I might monogram it too. What do you think?

Natural Deodorant

So, I have a confession to make. I do not buy deodorant from the store. I make my own natural deodorant out of items from my baking cabinet. I had seen this on sooo many blogs and decided to try it out myself. I am one who is willing to try almost everything at least once and if it doesn't work I do not continue to use it. I already had all of the ingredients on hand so I truly had nothing to lose.
Ingredients needed;
4-6 Tbsp of Coconut Oil
1/4 cup Baking Soda
1/4 cup Cornstarch

Mix your cornstarch and baking soda with a fork until there are no clumps.

Mix in your coconut oil and it turns into a paste.

Place in a cleaned out deodorant container or in a small tupperware container. Store in the fridge to make it hard like stick deodorant. If you leave it at room temp it will remain a paste. Apply like you would regular deodorant. What I noticed with this deodorant when you sweat that there is no odor. When you wear regular deodorant and sweat the smell of the deodorant mixed with BO gets stronger. This is not the case with the natural deodorant. It is AWESOME! Plus there are no harmful chemicals in it. It also takes less than 5 minutes to make. It is totally worth my time and money to make this. I've converted some of my family members and they love it.

This recipe came from Kitchen Stewardship. She also goes into more detail on why this is so much better for you.

Try it. I dare you!

9/18/11 Coupon Inventory

Here is this week's coupon inventory for the Newsgazette. Just click on the following link to get there.
9/18/11 Coupon Inventory

Happy Couponing!
Tabitha

Sunday, September 11, 2011

For the Coupon Lovers!

After reading Pick Another Checkout Lane Honey by Joanie Demer & Heather Wheeler from the site http://www.thekrazycouponlady.com/ (She's the gal that was featured on TLCs Extreme Couponing) I've rethought my coupon organizing system. I usually just cut out the coupons that I know we will use and then give away the rest. They suggest keeping them all. Their logic is yes, you may not use that item but if you can get it for free or as a monyemaker by getting Register Rewards or Extra Care Bucks then, you can donate that item and use the store credit on something your family really needs. I hadn't really thought of it that way. So, now I'm trying the whole save the inserts in page protectors in the binder route. To keep track of what coupons are in the inserts I've created a spreadsheet. I am such a paper organizing nerd and I don't care who knows it! So to reduce the workload for you all I'm sharing this weeks coupon insert organizing sheet from the Newsgazette. Let me explain the spreadsheet a little bit. The first column is Qty for quantity. Here you put the number of copies you have of that specific coupon. Next, is item and I think it's pretty self-explanatory. Third is the value of the coupon. The next Qty is for how many of that product you must purchase in order to use that coupon. Last, but not least is the expiration date for the coupon. The coupons are listed in the order they appeared in the insert. For a FREE copy just click on this link Coupons for 9/11/11. I hope you find this helpful and it keeps your hands from cramping up from all that writing this week. Print it out and put it with your coupons and you are D-O-N-E for the week! Now, go spend that extra time with your family!