So, the baby wipes were an epic FAIL! There are 2 reasons for this;
1. The paper towels were junk. I should have used Bounty or Viva. They just fell apart when I pulled them out of the container and were not strong enough to clean a dirty bum. It just made a bigger mess.
2. I made them on the 25th of October and they molded on the 1st of November. That only gives you a one week window of use. We don't use wipes that fast so, this is not cost effective for us at all.
It's a great idea but if you don't use tons of wipes it really isn't worth it. I didn't even use half of the wipes. So, for now we will stick to our Up and Up Hypoallergenic wipes from Target.

Wednesday, November 2, 2011
Tuesday, October 25, 2011
Homemade Baby Wipes
I just made something off of my "To Try" list. They are homemade baby wipes made with just TWO ingredients; water and coconut oil. It was ridiculously easy and took all of 5 minutes. Now, we have to test them on lil man's bum. He has really sensitive skin. If these work I will totally kick myself for not making them sooner! If they don't work for him then I can use them for removing my makeup. It's a win/win situation! Don't you just love it when you can use a product for more than one thing? It makes my life even simpler and there's less to buy. If you would like to make your own click Here for the tutorial. I'll keep you posted on how well they work.
Pumpkin Spice Brown Sugar Scrub

Nothing says Fall like Pumpkin Spice and Brown Sugar. I am loving making my own homemade beauty products. Especially, when I have the ingredients right here in my house. No special products to buy or extra trips to the store. I found this recipe for this sugar scrub here . This is a wonderful blog full of great ideas that I can't wait to try. Some other things that I will be trying from Stephanie's blog are;
These are great gift ideas! Click here to check out Stephanie's Blog. You won't be disappointed.
Monday, October 24, 2011
Preschooler Picture Chore/Daily To Do List
Lil man is in a helping/do it myself stage. So, I decided to make him a chore chart. Since he can't read yet I wanted pictures. I looked all over the internet and couldn't find what I wanted. So, I got out my camera and took pictures of his world to make it more personal for him.


After I took the pictures I edited them and added text. I printed them out on our printer and then laminated them. It's the first step. I'm trying to decide what I want to do next. I am still short the "say your prayer" pic but, will have that soon. I would love to hear any suggestions.
Super Goop
I really like the book, The Preschooler's Busy Book by Trish Kuffner. The activities, crafts, and recipes are simple and non-expensive. They aren't time consuming either. It's very mom friendly. We recently made the Super Goop found on p.211

You can place it in a freezer bag for no mess play. It's fun to squish. Little fingers love it. This would also be quiet enough for church. I'm always in need of quiet toy inspiration.

You can also use it for tracing letters and shapes.
Super Goop:
2 cups water
1/2 cup cornstarch
Food coloring
Boil water in saucepan. Add cornstarch and food coloring and stir until smooth. Let it cool and have fun!
Family Photos
We haven't had family photos since lil man was 1. He will be 3 next month! My mom came down and it was perfect out for family pics. After and hour and a half I still have no family picture. At first I cried. Now, I'm just laughing because who really can get a 3 year old to take a perfect pic? I would love to hear if you've had a similar experience. Please don't tell me I'm totally alone in this. So, here's a lil taste of our pics.

Crying

Walking Away

Put me down!
I am seriously contemplating hanging the first one.
Thursday, September 22, 2011
Mantle Clock Makeover
Josh gave me this clock for Christmas when we were dating. It has been sitting on top of the Entertainment Center since that day and never changed. That was 7+ years ago. I was itching for a change but didn't want to buy a new clock. This one is special to me. So, I decided to give it a facelift.

Before

This was the simplest, cheapest project ever! I found a piece of scrapbook paper that I liked and used mod podge to glue it over the existing blue mat. I used the same scrapbook paper to wrap the candle in the Apothecary Jar to tie it together. I then printed out the saying "Families are Forever" from my computer and it's held in with scotch tape. I can change out the quote at any time. It took about 10 minutes total and cost less than $1. I love making something totally new out of something I already own. It's better than shopping!
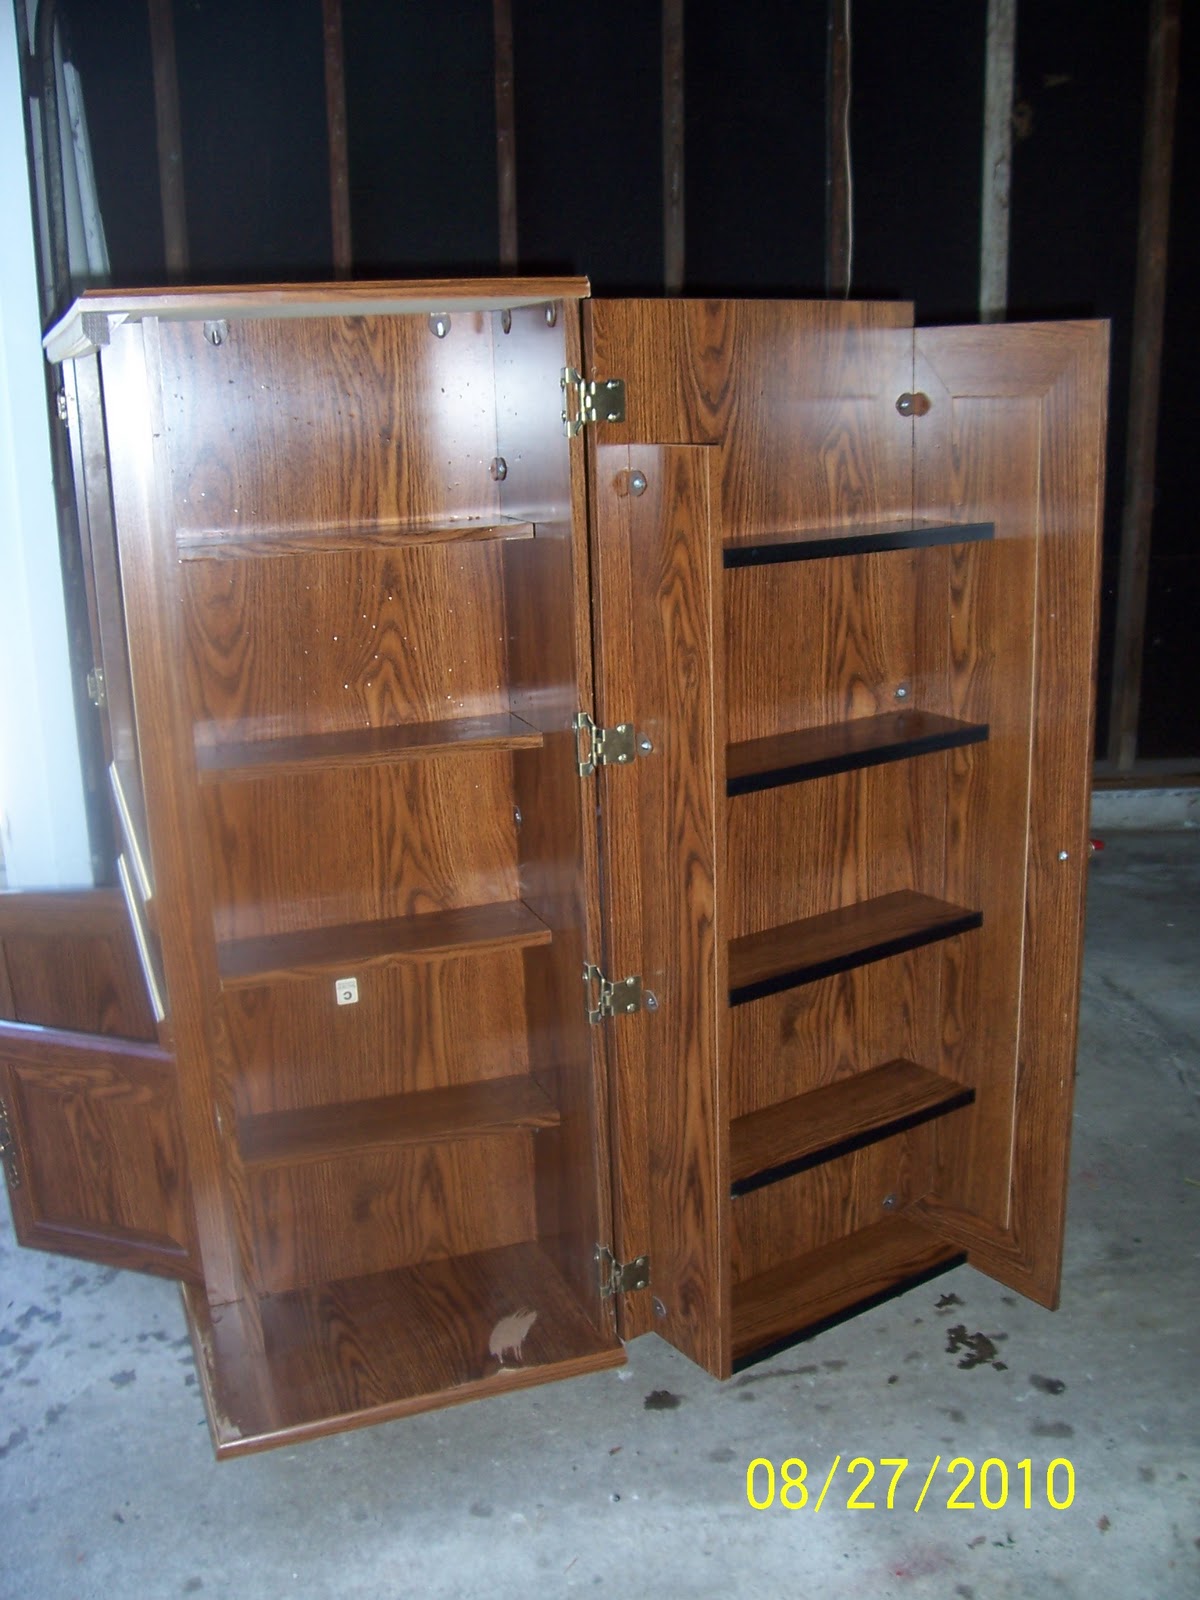
My First Furniture Makeover!
One of my favorite sites to follow is http://www.infarrantlycreative.net/. She does some amazing things with a can of spray paint and someone else's trash. She calls these roadkill rescues. I'm a fan of Craigslist and I happened across this entertainment center listed for FREE! Free is always better. She looked a little dirty and worn but, with a little paint and some new hardware I knew she could be a real looker.

Here's a Before shot. I fell in love with all of the storage space. It is way bigger than the entertainment center we had before. It's missing the glass door in this picture. Josh had to reglue the frame back together.
This is one of my favorite features about this entertainment center. One side is for DVDs and the other CDs. We have put all of Lil Man's DVDs in there. It is perfect!

Pic of the original hardware. I wasn't a fan.

Ta Da!! I gave her a couple coats of primer for laminate and a few coats of black paint. I added brushed nickel knobs for an update. I liked all of the shelf space but, I didn't like that you could see everything in there. I don't like clutter and it was very distracting. So, thanks again to Infarrantly Creative I came up with this;

I bought some coordinating fabric and pinned it up with flat head tacks. So much better. It's amazing what one piece of fabric can do to the whole piece. I also used the fabric trick on a glass cabinet in my bathroom.
I'm not going to lie this took a lot of work and I wanted to give up halfway through but, with a lot of encouragement from my husband it is now sitting in my living room and I love it!
Tuesday, September 20, 2011
Baby Shower Decor/Ideas
Saturday, my friend, Mika and I threw a shower for our very good friend, Tiffany who is expecting a little boy. We had a great time planning and decorating. Here are some of the things we did.

Mika did an excellent job with the games and prizes. For the prizes there were popcorn bowls with popcorn and M&Ms. I love the "She's Gonna Pop" sign.

We used toys for centerpieces and then we had mommy advice cards on the table.

I made little ovens on my Sillhouette. Each bag had a cinnamon roll in it as a thank you.

Mommy's chair of honor. We also hung a clothesline complete with the stork flying over head.

I have seen diaper cakes and wreaths but, I really liked this. It was very appropriate because Tiffany's husband loves motorcycles. I saw a picture of this on Amazon. Josh helped me with the wheels. It was just a matter of spacing them out on the ribbon. I will have to post a tutorial. I loved how this turned out!

Side view
I hope this gives you some decor ideas for the next shower that you plan.
Sunday, September 18, 2011
Cami Fake Out
Don't you just hate it when you find a super cute shirt and then you try it on and it reveals just a little bit too much? For me that means adding a t-shirt or camisole under it. I don't know about you but I hate the extra bulk and warmth it provides especially in the summer. So, I got out some scrap knit and whipped up one of these little babies;

Supplies needed;
2 snaps
any color of knit and matching ribbon
sewing machine
As far as skill level involved it is very basic. Measure the distance between your bra straps while wearing your bra. Then, measure to the base of your bra. Knit stretches so you can cut the knit a little smaller so it fits more snug between your straps. I hemmed the top and zigzagged stitched. Then, I attached the ribbon to both sides. Make sure to heat seal the ends of your ribbon with a lighter to prevent fraying. Next, attach your snaps making sure there is enough ribbon to wrap around your bra strap. That's it! You are done.

So much better and no extra bulk! It is very comfortable and you don't even know you are wearing it. No more bending over and worrying about everyone seeing down your shirt. These would be great for moms who are nursing too. Now I'm going to make a bunch of these in different colors. You can also add lace to the top too. It is very basic so it's easy to personalize. Hope you find this one helpful.
Goodwill ROCKS!
I am not ashamed of thrift stores or garage sales. It is one of the best ways to save money. Lil Man and I got to spend the day with my Dad last week and we hit up the local Goodwill. We had a great time! Well, lil man sure did. He made out like a bandit.

He got a Radio Flyer fold up tricycle in great condition for $5. I've seen these at the store for like $40. He is absolutely thrilled with his new wheels!

We also found this fully stocked Little Tikes workshop for $5! Now he has his own spot in the garage to work in with Daddy!
Last, I found him the most adorable Halloween costume. I was originally going to make his costume but, he really like the one we found and so did I. I will post pics of it later.So, hit up your local thrift shop and see what great things you can find!
Homemade Apothecary Jar
I love Apothecary Jars but, I am not willing to pay the price for them. I happened across the site http://www.dollarstorecrafts.com/ and found this simple tutorial. I spent about $10 total. I couldn't think of what to put into it so, it's been sitting naked on top of the entertainment center until the other day.

I bought a bag of river rock and a tall glass candle from Dollar Tree. Then, I wrapped scrapbook paper around the candle and tied it up with rafia. The paper is removable so I can change it out. I attached it with scotch tape. Last, I LOVE the beaded vines. They are literally all over my house so of course I added one around the base.

I love how it turned out and I'm really excited that I can change it out for seasons and holidays. I think I might monogram it too. What do you think?
Natural Deodorant
So, I have a confession to make. I do not buy deodorant from the store. I make my own natural deodorant out of items from my baking cabinet. I had seen this on sooo many blogs and decided to try it out myself. I am one who is willing to try almost everything at least once and if it doesn't work I do not continue to use it. I already had all of the ingredients on hand so I truly had nothing to lose.

Ingredients needed;
4-6 Tbsp of Coconut Oil
1/4 cup Baking Soda
1/4 cup Cornstarch

Mix your cornstarch and baking soda with a fork until there are no clumps.

Mix in your coconut oil and it turns into a paste.

Place in a cleaned out deodorant container or in a small tupperware container. Store in the fridge to make it hard like stick deodorant. If you leave it at room temp it will remain a paste. Apply like you would regular deodorant. What I noticed with this deodorant when you sweat that there is no odor. When you wear regular deodorant and sweat the smell of the deodorant mixed with BO gets stronger. This is not the case with the natural deodorant. It is AWESOME! Plus there are no harmful chemicals in it. It also takes less than 5 minutes to make. It is totally worth my time and money to make this. I've converted some of my family members and they love it.
This recipe came from Kitchen Stewardship. She also goes into more detail on why this is so much better for you.
Try it. I dare you!
9/18/11 Coupon Inventory
Here is this week's coupon inventory for the Newsgazette. Just click on the following link to get there.
9/18/11 Coupon Inventory
Happy Couponing!
Tabitha
9/18/11 Coupon Inventory
Happy Couponing!
Tabitha
Sunday, September 11, 2011
For the Coupon Lovers!
After reading Pick Another Checkout Lane Honey by Joanie Demer & Heather Wheeler from the site http://www.thekrazycouponlady.com/ (She's the gal that was featured on TLCs Extreme Couponing) I've rethought my coupon organizing system. I usually just cut out the coupons that I know we will use and then give away the rest. They suggest keeping them all. Their logic is yes, you may not use that item but if you can get it for free or as a monyemaker by getting Register Rewards or Extra Care Bucks then, you can donate that item and use the store credit on something your family really needs. I hadn't really thought of it that way. So, now I'm trying the whole save the inserts in page protectors in the binder route. To keep track of what coupons are in the inserts I've created a spreadsheet. I am such a paper organizing nerd and I don't care who knows it! So to reduce the workload for you all I'm sharing this weeks coupon insert organizing sheet from the Newsgazette. Let me explain the spreadsheet a little bit. The first column is Qty for quantity. Here you put the number of copies you have of that specific coupon. Next, is item and I think it's pretty self-explanatory. Third is the value of the coupon. The next Qty is for how many of that product you must purchase in order to use that coupon. Last, but not least is the expiration date for the coupon. The coupons are listed in the order they appeared in the insert. For a FREE copy just click on this link Coupons for 9/11/11. I hope you find this helpful and it keeps your hands from cramping up from all that writing this week. Print it out and put it with your coupons and you are D-O-N-E for the week! Now, go spend that extra time with your family!
Tuesday, August 30, 2011
Meijer, CVS, Walgreens

Gearing up for Smore season. Stocked up on church snacks.
Meijer:
Hershey's 6 packs 2/$5- $1MC= 2/$4
Meijer Graham Crackers: $2
Meijer Marshmallows: FREE
Goldfish Crackers: BOGO Free $2.39 for 2
Ritz, Triscuits, 2 Wheat Thins: $1.99 per box- $3 off 4 boxes
Total: $15.93 Total Savings: $16.96

Jump start to Halloween stock.
Walgreens:
1. Vanilla Carmex $1.50 get $1.50RR
Total: $1.63 Savings $0.49
2. M&Ms 4/$10 get $5RR - $2.50MC
Wrigley Gum: $0.99
Total: $7.72 Savings $9.66
3. Pampers Cruisers $19.99 get $1RR - $1.50MC - $2.00SC
2 Hershey Bars for fillers: $1.79
Total: $15.19 Savings: $11.50
4. 2 Dozen Large Eggs $1.29 per dozen - $0.55MC
Total: $1.06 Savings $2.35
Total out of Pocket: $25.60 Total Savings: $24.00

CVS:
1. Colgate Sensitive Pro-Relief $4.99 get $1 ECB - $1.50MC- $1 ECB (from previous visit)
Total: $2.93 Savings: $3.80
2. 2 Gallons Dean Milk $3.19 get $1 ECB- $1 ECB
Total: $5.44 Savings: $1.00
3. 3 Boxes of Puffs at $0.99 - $2 ECB
Total: $1.23 Savings: $4.64
Total out of pocket: $9.60 Total Savings: $9.44
Thursday, August 25, 2011
Walking Away
I admit it; Couponing is ADDICTING! There is nothing quite like seeing your total and then watching it fall with each coupon swiped. It is a total rush and a very fun game. But, in order to not go crazy you have to give yourself limits. This week I had to limit myself : ( It was so hard to walk away from a fabulous deal! But, it can be done, I promise. I had scoured the ads. Meijer's looked pretty good. They were having a 10/$10 11th item free sale. So, I wrote down everything that I would buy. Then, I looked at the County Market ad. (I write my list by order of the stores I go to). I ended up crossing some things off of the Meijer list and putting them onto the County Market list. Grands Biscuits were $1 at Meijer and $0.88 at County Market. It was the same for; carrots, Knorrs Rice Sides, Hunt's Ketchup, and Tony's Pizza. Jackpot! I had coupons for the Grands and the Knorrs Rice making them $0.73 and $0.63 respectively. Here's the thing I already have 7 tubes of Grands and 5 or 6 pouches of the Knorrs Rice. While this is a GREAT deal I didn't need anymore. I needed to spend my grocery money on things that I really needed. This was fine in theory but when I got to the store it was very hard to rationalize with myself that I truly didn't need it and walk away! But, walk away I did. Now, someone else can enjoy this fabulous deal.
This doesn't just apply to groceries. Just because something is a "good deal" does not mean we have to get it. Ask yourself if you truly need it? Can you live without it? Do you have something that is already similar? Are you still going to love it in a year? If you can't answer an absolute "yes" to all of these questions it would be a good idea to walk away. If you do answer yes give yourself at least a 24 hour time limit before you purchase the item. The time limit gives the adrenaline time to wear off and you the time to make a sound decision.
This doesn't just apply to groceries. Just because something is a "good deal" does not mean we have to get it. Ask yourself if you truly need it? Can you live without it? Do you have something that is already similar? Are you still going to love it in a year? If you can't answer an absolute "yes" to all of these questions it would be a good idea to walk away. If you do answer yes give yourself at least a 24 hour time limit before you purchase the item. The time limit gives the adrenaline time to wear off and you the time to make a sound decision.
Wednesday, August 24, 2011
Book Review: Save Me

This was a pretty intense read. If you had to choose saving your child or three other children (who are closer) who would you save? Add into account that these three are bullying your child. What would you do? The heroine of this story has to make this decision and deal with the consequences. As the story evolves there is so much more to this story than what is on the surface. To discover what's under the surface check this one out at your local library! You won't be disappointed.
Thursday, August 18, 2011
Girls Night Out
As moms we put ourselves last. It's what we do. We need to remember to take some time for ourselves too. I am really bad about this. I don't remember the last time I left the house by myself to do anything other than go to church, the store, or work. Last night was the first time in a long time and I totally needed it! I needed a break to rest and recharge my batteries. I forgot what it was like to go to the store and just look around without hearing, "I want it!" Here's a total shocker; I didn't have to share my food or ice cream! It was great! I totally love my child. He is my greatest blessing along with my husband of course. But, I am not just a wife and mother. I am also a person who every once in a while needs a break so I can be a good wife and mother. When I got home my husband could tell the difference and even suggested that I make it a regular thing. I think I will. Thanks Tiff for a great night! I can't wait to do it again!
So, take some time for yourself. Daddy's need one on one time with the kids too. It's great for bonding. Go take a walk or wander around a store, go to dinner or ice cream, watch a movie, or whatever interests you.
So, take some time for yourself. Daddy's need one on one time with the kids too. It's great for bonding. Go take a walk or wander around a store, go to dinner or ice cream, watch a movie, or whatever interests you.
Wednesday, August 17, 2011
Life WITHOUT TV
The reaction I normally get when people find out we don't have TV is, "Really? Why not? How can you live without it?" We still physically own 2 but, we use them to watch movies. Truthfully, it's not that hard to do without TV. The last time I had cable was when I lived at home. I was a poor college kid and to me cable was a luxury that I could do without. Plus, in Nursing School there was no time for TV. When Josh and I got married we survived with a rabbit ear antenna. I worked nights so I slept during the day and Josh worked and went to school. Neither of us had time for TV. We did get one of those converter boxes when TV switched to digital. But, it shorted out before lil man turned 1. We made the decision not to replace it. So, that ended my evenings of Rachael Ray, Oprah, Friends, and all the other nightly WB TV watching. It was extremely difficult at first. I had to figure out what to do with all of this time I now had. When you quit watching TV you realize how much time you were really wasting. So, what are the benefits of not spending time in front of the TV?
1. I do not have to worry about lil man hearing inappropriate language or seeing any violence or adult content. Let's be real TV programs now are nothing like they were when I was growing up. We have more control over what we watch with movies.
2. I don't hear, "I need, I want" for any toy or product being advertised on commercials. This definitely benefits the budget.
3. We spend real time as a family. We talk at dinner time. We take walks, ride bikes, play outside, garden, and work on projects together.
4. We read a lot in the evenings. We want lil man to love books as much as we do.
5. Our house projects get completed a little bit faster.
6. I have learned to sew and do all kinds of crafts. Plus, I've taken up blogging about it all.
7. No cable or satellite bill.
I am not saying that we never ever watch TV. My guilty pleasure is watching Grey's Anatomy and I can watch that online. We do watch movies but, we have been better able to control our time. When we had the box it was so easy to just leave the TV on and just let it flow from one show to the next and completely tune out.
I feel that we have tuned out the TV and tuned into life.
I challenge you to go one week without any TV. I guarantee it will change your life!
Monday, August 15, 2011
8/15 Shopping

Aldi:
Cantaloupe $0.99
Peaches $0.29each x 4
Plums $0.29each x 3
Bananas $0.43/lb x 2.23lbs
Strawberries $0.99/lb x 2
Red Grapes 2lbs $1.98
Iceberg Lettuce $0.99
Applesauce $1.29
Ground Turkey $1.49/lb x 2
Total Spent: $13.33

CVS:
#1: Pampers Cruisers $19.99 get $3ECBS plus I had a $2.50 MC
The Magic Coupon Machine game me 2 awesome coupons; Free CVS Brand Fabric Bandages and a Free Hershey's Bar! Obviously, the chocolate didn't make it home. Honestly, it almost didn't make it to the car!
Total 1: $19.62 Savings of: $11.28 Plus got my $3 ECBS
#2 Dean's Milk $3.19 per gallon. CVS allows ECBs to be used on dairy!
Total: $0.22 plus I got $1 ECB!!

Meijer
Sweet Corn 4/$1
Oral B Stages $1.89 - $0.50MC
Oral B Toothbrush $1.89 - $0.50
Total $4.12
Walgreens:
Blue Rhino Propane Tank. If you exchange your old tank it is $18.99 then there is a $3 mail-in-rebate making it $15.99. Not a bad deal.
Total with tax: $20.65
Friday, August 12, 2011
Homemade Blueberry Ice Cream

This summer Aldi sold a Crofton Ice Cream Maker for $19.99. It does not require rock salt. You freeze the insert and that's it. Once the insert is frozen you place it in the maker and then add your cold ingredients and 20-30 minutes later you have delicious ice cream.
I bought blueberries when they were $1.66/pint. My husband loves blueberries so, I bought 3. With them I made this ice cream and 2 batches of blueberry pancakes. I have never had blueberry ice cream. I found the recipe when I googled, "blueberry recipes." I had all the ingredients and it sounded awesome. It tastes just as good. If you have an ice cream maker you will definitely want to try this one!
2 cups whole blueberries, washed
1 cup sugar or splenda, etc
1 Tbsp water
2 cups heavy cream or half and half
Boil blueberries, sugar, and water until sugar is dissolved and berries are soft. I used a potato masher to smash the berries. Strain mixture over a bowl. Discard the skin and seeds that are in the strainer. Next, stir in the cream. Refrigerate mixture over night.
Fill ice cream maker 2/3 full and turn it on until mixture is thick.
Place in freezer for 2-4 hours before serving. This allows it to be firm.
Serve in a waffle cone or bowl and enjoy! It's the perfect remedy for a hot summer day!
Dry Erase Calendar

This is one of my favorite new things! I am striving little by little to have our family go paperless. The last project that I showed was the dry erase board found Here. I promised to follow up with this calendar. I followed the tutorial on Infarrantly Creative found Here. I love hers more! Mine is not magnetic, yet. I haven't found the metal for the right price. Total cost of this project $4!! Here's how I made mine;
16x20 picture frame bought at a garage sale for $4
Black Spray Paint for the frame
Cream-Colored Cardstock
Polka Dot Ribbon
For the grid I used our old calendar. I set the glass on top of it and used a black Sharpie to trace it. I added a 6th row of squares so I would never have to double the numbers on one square. Make sure when you put the glass in the frame that the Sharpie side is not facing out. It will wipe off.
An alternative would be to use vinyl instead.
I plan on making it magnetic and adding Magnetic numbers. I also want to change out the cardstock for some neutral fabric.
Another tip is to buy fine tip dry erase markers. They are much easier to read. I bought a multi-colored pack so, I can write Pay Day in green and Birthdays in Red, for example.
Now, go have some fun and make your own personal dry erase calendar for your family!
Saturday, August 6, 2011
Under Construction
If you haven't noticed I've been making major changes to the blog. I am doing this myself through trial and error. Please be patient with me as I make these changes to make the site more organized. My OCD has kicked into overdrive!
If you click on the Kitchen tap it will take you to recipes that I have on this blog plus a list of great websites for recipes. I will be adding more pics above the links as I go. If you would like to submit any recipes to be featured please contact me at nestingmadesimple@gmail.com Hope you enjoy the new layout and that it's easier to navigate.
Have a great weekend!
Tabitha
Book Review: Might as Well Laugh About It Now

If you are looking for an upbeat, lighthearted, guaranteed to make you laugh out loud book, this is it. I found this at our public library. I like Marie Osmond and I was curious about the title so, I checked it out. One great thing about the library is, if you don't like the book you aren't out any money! Well, the title certainly delivered. I loved sharing the stories with my husband and also with, Mika, during our 5:30 am walks. It definitely gave us something to laugh about that early in the morning. I also learned the importance of a Sharpie as a necessity to a woman's cosmetic bag. If you want to know why you are just going to have to read the book. Some things you just have to read for yourself!
Subscribe to:
Posts (Atom)